EcoWorthy Power
By Maui Systems Ltd
One of our customers was looking at ways of optimising their energy usage; their existing energy tariff has points in the day where their electricity costs are significantly higher, so could we use a battery system to run their key systems during the expensive hours?
Most IT battery systems are designed to provide power during an power outage, to work as an uniterruptible power supply (UPS). However UPS systems tend to last for minutes rather than hours, to allow the automatic startup and switch over to a generator, or to give enough time for a system to shutdown cleanly when there is no alternative supply.

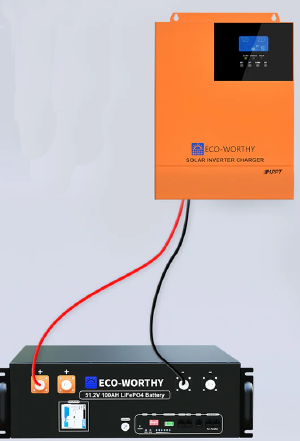
Eco Worthy offer a kit consisting of two 5.1KWh rack mounted batteries and an AC charger/inverter. They don’t have the same capabilities as the AC coupled systems (no monitoring of the grid load so no ability to dynamically charge and discharge), but do have the functionality to switch the output load between AC or battery. This allows the batteries to be charged during the cheaper rate periods, and supply power when the energy prices are higher. They can also work as a big UPS - which seems to the be default assumption.
The kit itself is considerably cheaper than the AC coupled units we’ve worked with before. Where it shows is the documentation; the batteries we were sent were a previous generation than expected and the supplied documentation didn’t match the devices, nor what we could find online. To make things worse, the inverter and batteries didn’t have the right settings out of the box, so the batteries wouldn’t charge. So much for ordering a kit.
For over 2 weeks, we were back and forth with EcoWorthy support, trying to find out what the issue was. The inverter is rebranded from SRNE and SRNE eventually sent a video of how to reset the inverter to factory defaults; but certainly not in english and nothing in the accompanying email that said what we were supposed to be doing or why. Looking for information on SRNE inverters we finally came across something that said to reset to defaults, two buttons needed to be held in. Now the video started to make sense.
Would love to say Eco Worthy support were great through all of this, but in reality we were so close to just returning everything and saying it wasn’t fit for purpose.
Physical Setup
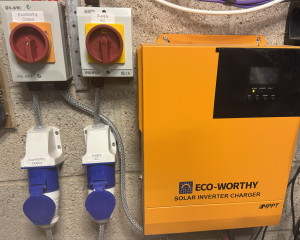
In this install, the batteries were installed in the bottom of the IT rack and the inverter on the wall adjacent; it isn’t a rack mountable item and suggests mounting on a non-flammable substance - fortunately it’s a concrete block wall. The inverter has a PV input, but in this situation there is no solar component; just AC and batteries.

Output from the inverter is fed via another rotary isolator to a second 32A commando outlet. The original 32A commando plug was moved to the new socket, and it feeds the power distribution unit (PDU) for the kit. We’ve used a new 32A outlet for consistency with the old one. The inverter is rated at 5KW, so 20 Amps at 240V. Customer electrician did all the zappy sparky bits.
We used the original isolator to allow us to test mains failure and show the new system can run the rack purely from batteries. The second isolator on the output of the inverter allows power to be switched off to the rack - mirroring the original isolator function.
Using two commando sockets allows the cabinet to be quickly put back onto the original mains supply, bypassing the inverter and the battery system. Useful should their be a fault or maintenance needs to be done on it in the future.
The DC cables from the batteries to the inverter were custom made for us by a local supplier using SurLok Plus plugs, with corresponding bulkhead sockets on the cabinet - avoiding the need to route DC cables up, down, around, under etc etc. Again, it makes it easy to isolate the DC side of things if needed.
Unfortunately we can’t include any other photos of the installation due to the sensitive nature of the customer environment.
Controlling Power Storage and Delivery
Eco Worthy have an app for monitoring the battery and the inverter comes
with a different app again. Neither were very stable, and they don’t get
very good reviews from users in various forums. However we didn’t go into
this blind without some research; the rebranded SRNE inverter is supported by
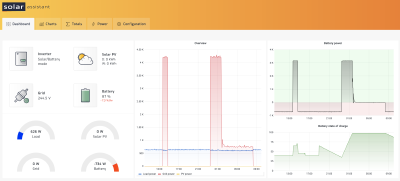
Solar Assistant which runs on a spare
Raspberry Pi.

The Eco Worthy inverter doesn’t have any ability to switch settings on a time schedule itself; but Solar Assistant can be set up to do that.
Inverter Anomilies
The inverter wasn’t supplied with any cable to connect it to the batteries to monitor the BMS (battery monitoring system). This is usually essential on LiFePO4 batteries. One was sent out by the support team much later, and so far, seems to be working fine. It’s just a bit of Cat5e cable with pins 1-4 rolled over and 5-8 straight through, so why this either couldn’t be supplied or at least documented, I’ve no idea.
  A end     B end
  Pin 1  -  Pin 4
  Pin 2  -  Pin 3
  Pin 3  -  Pin 2
  Pin 4  -  Pin 1
  Pin 5  -  Pin 5
  Pin 6  -  Pin 6
  Pin 7  -  Pin 7
  Pin 8  -  Pin 8

  (doesn't matter which end is inverter or battery)
The inverter setting screens don’t all match the supplied or online documentation (are you starting to see the pattern?); there are still some settings we haven’t worked out. For this job, these are the ones that we did figure out and really mattered to us. You won’t find them in the manual - unless they’ve released an update.
Work Priority - Setting 1
The documentation says this has 3 options
- ‘SOL’ - solar priority, fail back to AC utility when the batteries are flat
- ‘UTI’ - AC priority; switch to batteries only when AC fails
- ‘SBU’ - Switch to AC only when battery is flat (Solar->Battery->Utility?)
The unit we have actually has 4
- ‘SOL’ - solar priority, fail back to AC utility when the batteries are flat
- ‘UTI’ - AC priority; switch to batteries only when AC fails
- ‘SBU’ - Switch to AC only when battery is flat (Solar->Battery->Utility?)
- ‘SUB’ - Maybe Solar->Utility->Battery?
Communication Protocol - Option 32
None of the documents we’ve found describe an option 32; but we were asked to set it to ‘485’ when we got the new BMS cable. This means it’s going to be the communication protocol to use - RS485 vs CAN.
Battery Protocol - Option 33
Option 33 is also undocumented; it seems to be the BMS protocol to use to talk to the batteries. Interestingly, this needs to be set to ‘PYL’ according to the support team. The same protocol needs to be set on the batteries themselves, using the appropriate bluetooth based app. ‘PYL’ is the default on the batteries, so you might be lucky and things just work.
It’s interesting as SRNE inverters usually use the ‘WOW’ protocol and the batteries seem to have that option. But they’ve opted to use a protocol from a totally different manufacturer, Pylon. If you happen to look at other simiar batteries (like Fogstar for instance), they all seem to be built around the same number of cells and the same BMS unit; maybe the Pylon protocol is the most stable on the 3rd party BMS?
Charging and discharging
N.B. We have no solar panels connected to this inverter, so assumed that ‘charge from Solar Only’ would mean nothing taken from AC
For regular/cheap rate running, we wanted to charge the batteries and power the IT kit. To get this to happen, we needed to set
- Option 1 (Work Mode) - ‘SUB’ - the mysterious new 4th option
- Option 6 (Charge Mode) - ‘CSO’ - solar then AC
The current thoughts are that this puts the output of the inverter into Solar first (there is none), Utility next (which should be ok) and Battery last. The batteries are being charged by Solar (none) and then AC.
We found that unless the work mode was set to the mysterious ‘SUB’ value, the batteries wouldn’t charge. ‘UTI’ would seem the obvious choice from the descriptions in the documentation, but that results in a charging rate of about 50W rather than 3000W normally; so be prepared for a very very long charging cycle.
For the expensive times in the day when we want it to run from batteries first and foremost, the settings needed to be:
- Option 1 (Work Mode) - ‘SBU’ - solar first, then batteries, then AC
- Option 6 (Charge Mode) - ‘OSO’ - solar only (i.e. no AC charging)
These options make sense (even if you do have Solar PV input) - batteries before AC on output and charge batteries only from the non-AC source.
Even Solar Assistant doesn’t have 4 options for the input/output (i.e. Work Mode) options on an SRNE inverter.
As a bonus, some of the ‘Charge Mode’ options only appear depending on the setting of the ‘Work Mode’! But none of that is mentioned in the manual of course.
End Results
We’ve delivered a solution for a customer where the charging (and discharging) times can be controlled on a relatively flexible basis. There is also a side effect that if there is charge in the batteries when there actually is a power cut, it’ll also act as a UPS. The kit has a managed UPS already, so this is just a bonus and may give a bit more runtime.
We used 2x 5.1KWh batteries (version 2) and the inverter from their kit; with a 700W load we can cover more than 12 hours on battery, so enough to deal with the daily energy price fluctuations this customer experiences.
Would we use this kit again? Possibly. The Fogstar battery units are now in a similar price range and the front panel LCD looks a lot better on them than the horrible menu system on these. We’d probably use those and a more main stream inverter like the Victron MultiPlus; sometimes it’s worth paying that little bit extra for the finishing touches - like manuals and support.
October 2025 Update
While the inverter worked fine for a while, we got reports that it would frequently not switch from mains/charging to battery power. The settings were right, but the front panel showed it was still in bypass mode. Cycling the power button would resolve the issue, but not a sustainable solution long term.
Remove/disable the BMS cable to the batteries and things worked fine; enable the BMS cable and it was erratic at best; maybe 1 in 5 or 6 times it would switch, but even then not consistently.
EcoWorthy support took their time, but did come back with a suggestion of parameters to change:
Battery to Bypass - option 4
Default value seems to be 49.2 - we were asked to lower this to 44
Bypass to Battery - option 5
Default value seems to be 57.6 - we were asked to lower this to 46
Results
These settings seem to affect the thresholds at which the inverter will switch to battery only - and we’re guessing that once the BMS cable was installed, the actual battery readings were now more accurate and this was causing the issue.
With these new settings, the inverter seems to move between battery and mains more reliably; in testing it switched without fault even with the BMS cable in and enabled.